OpenLiteSpeed1.2.8安装MySql5.5数据库(how to install mysql5.5 for openlitespeed1.2.8?)—加这句英文纯粹为了吸引谷歌蜘蛛用~~不用管
SSH连接下使用以下命令安装Mysql 5.5(过程中会提示设置mysql根密码,不设默认为空):
1 | apt-get install mysql-server-5.5 |
OpenLiteSpeed1.2.8编译安装PHP、Xcache
1、进入管理面板(在笔记一里已经讲过了),在导航栏Actions选项下选择Compile PHP编译PHP。

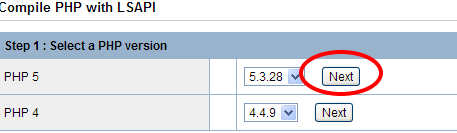
2、编译选项:选择php版本和模块,设定编译参数
我选择的是5.3.28,然后点击Next
选择了PHP Mail Header Patch、XCache
编译参数如下(如果要使用SPDY请在下面加入’–enable-spdy’):
1 | '--with-libdir=/lib/i386-linux-gnu' '--with-litespeed' '--with-mysql=mysqlnd' '--with-mysqli=mysqlnd' '--with-iconv-dir' '--with-freetype-dir' '--with-jpeg-dir' '--with-png-dir' '--with-zlib' '--with-libxml-dir' '--enable-xml' '--enable-discard-path' '--enable-bcmath' '--enable-shmop' '--enable-sysvsem' '--enable-inline-optimization' '--with-curl' '--with-curlwrappers' '--enable-mbregex' '--enable-mbstring' '--with-mcrypt' '--with-gd' '--enable-gd-native-ttf' '--with-openssl' '--with-mhash' '--enable-pcntl' '--enable-sockets' '--with-xmlrpc' '--enable-soap' |
注意:
(1)如果编译过程中出现configure: error: Cannot find OpenSSL’s libraries
那是因为64位的和32位的utunbu的用户库文件目录不同
需要在编译参数中加入下面语句
64位请使用:’–with-libdir=/lib/x86_64-linux-gnu’
32位请使用:’–with-libdir=/lib/i386-linux-gnu’
(2)如果出现其他错误提示请参照本站内ubuntu12.04安装LiteSpeed后编译php提示错误的解决方法汇总一文。
3、然后点击Next进入下一步,OpenLiteSpeed会自动下载所需要的软件包,等待下载完成,再点Next。
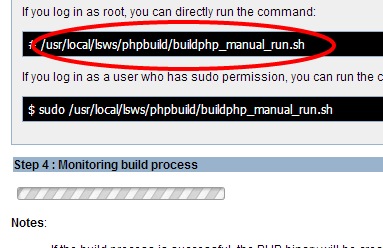
4、进入编译页面(编译过程中千万不要刷新页面,切记!)
openlitespeed为了安全起见,必须使用ssh端连接到服务器执行以下代码才能开始编译,如下图:
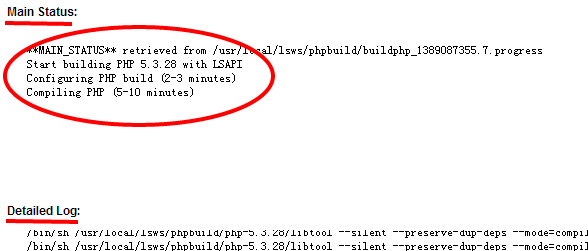
5、然后就是等待编译完成(需要的时间跟你的机器好坏有很大关系)
可以在页面的Main Status里看到大概需要时间、Detailed Log里可以看到详细的配置过程,错误会有提示,注意看
6、老牛编译到最后出现“**ERROR** Could not run PHPize for XCache”
原因:缺少PHPize扩展
安装命令(适用于Debian/Ubuntu系统):
1 | apt-get install php5-dev |
7、、、等待编译完成即可~~~~~然后重启服务器,在导航栏的Action下面点击Graceful ReStart。

评论0